
Ever wonder exactly what goes into planning and preparing for a Grand Canyon backpacking trip? Even if you’ve been backpacking before, putting together a trip on your own can certainly seem like a pretty daunting task. In this case having some trail experience goes a long way in making sure you plan a safe and feasible backcountry trip. The ability to enjoy the experience once you’re out there on trail relies heavily on knowing that all the details have been anticipated and taken care of–that’s where we come in.
This week at Rubicon Outdoors we’re getting ready for a private guided backpacking trip in Grand Canyon with an adventurous extended family of eight. These folks decided to celebrate Christmas by dropping into what’s affectionately known by some as “the big ditch” the following day. We’ll spend three days trekking through the heart of Grand Canyon, spending two nights below the South Rim. We thought we’d use this opportunity to give you a behind the scenes look at what our guides do to prepare for a trip like this.
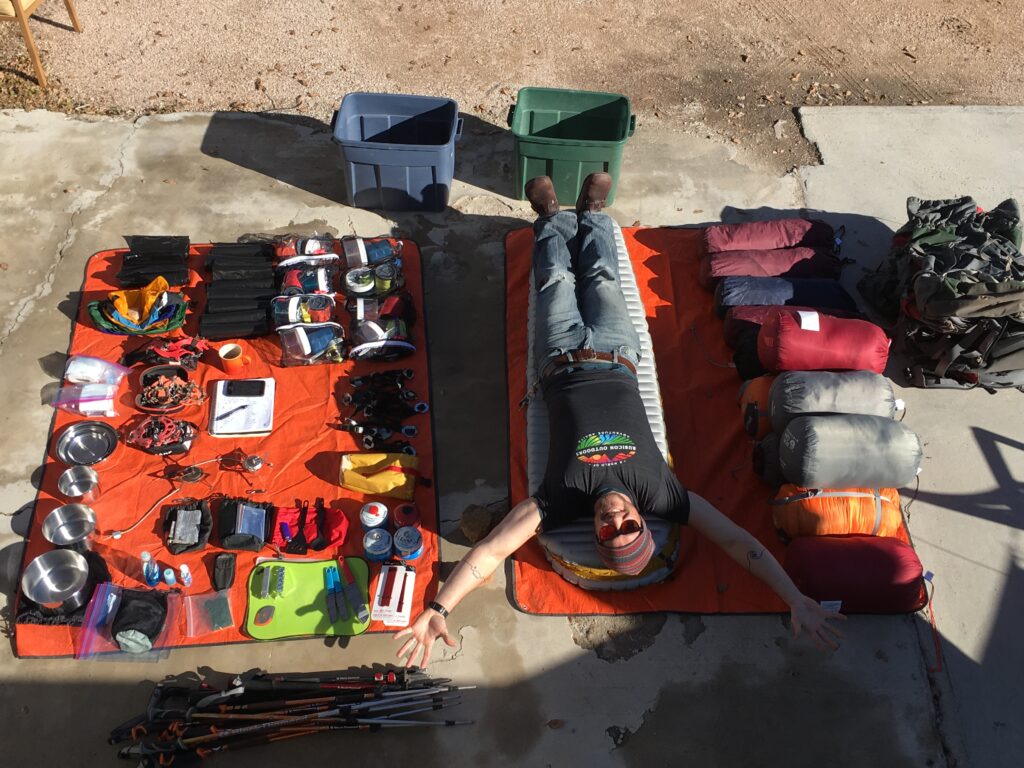
In reality all of the basic needs we all have everyday still have to be met in the field–we all need to eat and stay hydrated, we need shelter from inclement weather, and we need adequate clothing and footwear. We need to know where we’re going and how to get there. And that’s pretty much it; the only difference is that all of that has to fit into a (rather large) backpack.
Everything but the Kitchen Sink
Out of everything just mentioned, planning the menu for a trip like this one actually takes quite a bit of experience, trial and error, and experimentation to find just the right amounts of which foods to bring. To tell the truth, it’s probably an entire article on it’s own, but the basic questions we ask ourselves to get started are: Is it lightweight? Does it have high caloric value? Does it cook quickly (therefore not requiring a lot of fuel)? Will it keep? If the answer is “yes” to all of these, it’s a good bet for the trail. That doesn’t mean it all has to be dehydrated beans, gorp, and peanut butter either. We like that stuff too, but it is possible to bring some pretty gourmet meals into the backcounty and still stick to these four qualifiers. I’ve had guides make some of the best sushi rolls I’ve ever had using smoked salmon, three nights into an excursion.
The kitchen itself is much more simple to think about, and is an outdoor gearhead’s dream. There are a ton of gadgets out there at your local gear shop ranging from the pragmatic to the sort of ridiculous–for about $60 you can get yourself a hand-pump single-cup espresso machine just in case you get anxiety thinking about not hiking with a barista in company. But, for the most part, it’s all the same stuff that’s in your kitchen at home just a lot smaller and lighter: A stove with some fuel, a couple small pots, some utensils to serve with, a couple good knives and cutting boards, and stuff to clean up with afterwards. A dromedary is just a fancy word for “bag to put water in” and serves as a fine makeshift kitchen sink. A cup, a bowl, and a spoon for everyone to eat from rounds out the dinnerware.
A Roof Over Your Head
Shelter from the elements is one of the most important things we consider when planning a trip and extends beyond simply a roof over your head. However, some type of tent is a critical piece of equipment pretty much anytime you head out into the backcountry, and there are many choices. The choice is based on a combination of factors like weather and temperature, the likelihood of encountering biting insects, how many people are with you, and how comfortable you really want to be. For every possible combination of scenarios listed, someone has built a tent for just that purpose, from super simple ultra-light solo tarps to double-wall 10 person arctic-blizzard-proof tents. For our Grand Canyon trips we use two-person, three-season backpacking tents that provide a nice balance between being lightweight and comfortable, and are a great general workhorse type shelter. Like all of our equipment, each shelter is carefully inspected before departure to ensure it’s ready for weather.
Well-made appropriately sized sleeping bags and pads are also a must for any successful backpacking trip. Again, there are many choices available that boil down to the time of year and location of the trip. This time we’re bringing mummy-cut bags rated for cold weather between 0 and 5 degrees Fahrenheit. It likely won’t be that cold, but it’s better to unzip the bag when you get hot than shiver all night if the temperature does drop that low. We’ve also got a couple of pretty tall folks on this trip so we’re making sure we have “long” sized bags in the mix for them. Having a good sleeping pad will not only cushion you adding comfort (and a better night’s sleep), but will also help insulate you from the cold ground beneath. We’re using Thermarest’s inflatable Neo-Air for this trip. Along the same lines, making sure that all of our gear and food is protected from the elements (in addition to ourselves) by waterproofing our backpacks is a step not to be overlooked. We’ve got a fleet of Osprey packs ranging from 75 to 85 Liters–big enough to make sure we can bring everything we need on the trail.
It’s All About Looking Good…
When I was teaching a lot of outdoor education courses taking young students backpacking, I used to tell them this while preparing for a trip. I was mostly joking, but having the right clothing for the occasion makes a huge difference in having a comfortable trip. Layers made of material that will continue to insulate if they get wet, as well as good rain gear are absolute necessities. On the other hand, clothing that protects from heat and sun exposure can be key too. Sturdy hiking shoes or boots that fit-well and are adequately broken-in will make or break any backpacking trip. For our planning purposes, guides send out a detailed packing list of recommended items to participants to help them choose the best clothing for their trip.
It’s All Downhill from Here
When putting together a trip in Grand Canyon there’s really no other way to start than by heading on down the hill. But before that, having a well-planned itinerary is an important part of putting together a fun guided experience for others. Making sure that the distance and elevation is realistic for one day of travel is important and takes some trial and error. Most of our routes are tried and true, but every so often we’ll put together a new one; after pouring over the maps of an area, guides will head out to test itineraries to make sure they work before presenting them to potential clients. Having all the right maps, a compass, and the skills to use them are all important tools that our guides also carry with them on every tour.
It’s true that there are a lot of details to look after when planning a backpacking trip. But, after all the planning–equipment gathered and checked, food bought and packed up, and route mapped out and tested–most of the hard work is done. Part of the beauty in backcountry travel is that it’s simple. The rest is just one foot in front of the other…